menu   home About Me My Products  

Science Tools and Lab Safety for Primary Grades


One of the first Science units that I teach every year to my kiddos is about Science Tools and Lab Safety. It is a great way to familiarize the students with the Science tools that they will be using all year long. It is also a great way to teach them how to properly use them. It is important to remember that while you may be teaching young kids, you are also laying the ground work for all the Sciences that come later. Science in the primary grades prepares students for biology, chemistry, physics, etc…Since I teach second grade, I 
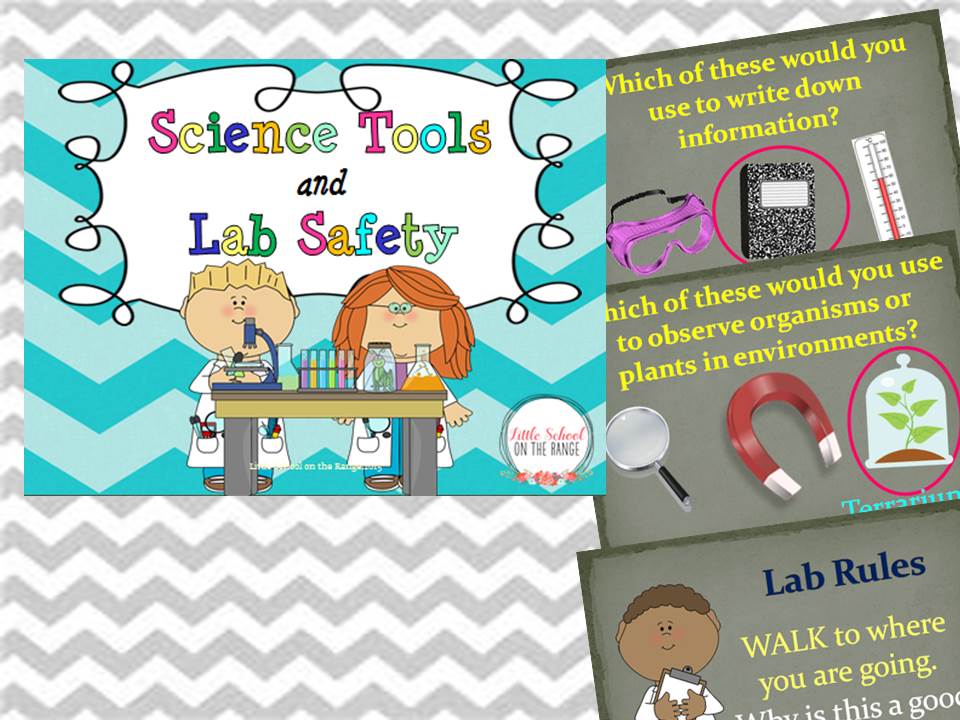
generally stick to the basic Science tools such as:
·         Magnifying Glass
·         Magnet
·         Microscope
·         Terrarium
·         Computer
·         Balance
·         Beaker
·         Weather Vane
·         Aquarium
·         Safety Goggles
·         Notebook
·         Thermometer
·         Rain Gauge
·         Stop Watch
·         Ruler
·         Scale

I have my students cut out fact cards for the different Science tools. We put them into a pocket in our Science notebooks for reference throughout the year.

If possible, have all the tools for the students to examine. I like showing the students the real tools as well as using a Power Point presentation that encourages discussion about the reasons we use Science tools.

We also discuss which tool is the correct tool for the different jobs…

Lab Rules are also crucial to teach students. Even if you don’t have a Science lab, lab rules are important to follow when performing experiments in your classroom.

My best-selling Science Tools and Lab Safety Unit can be found below


My Science Tools and Lab Safety Presentation can be found at:


OR, you can buy the BUNDLE and SAVE!!!


Postcards to Your Students - Setting the Tone for a Great Year


Kids LOVE getting mail! There really isn’t a better way to set the tone for the school year than to send postcards before school starts. It is a great way to open up the line of communication with the students and parents. I don’t know how many students over the years have told me that the postcard that I send them before school starts is the first piece of mail that they’ve ever received. Postcards are relatively inexpensive. You can usually find them at teacher stores in packs of 30. I will be sending my bunch out this week (one week before school starts). I generally just say something like:

“I hope that you’ve had a fun summer. I’m excited to be your teacher this year. I look forward to seeing you on the first day of school!”


You will be surprised with the amount of students that will bring the postcards to school to show you that they received them. I even get Thank You notes from students for sending them!

Simple Classroom Rules

Classroom rules are essential to classroom management. However, my classroom rules have changed in the years since I first started teaching. I used to start the year by establishing the rules. In college, I was taught that 4 to 5 rules were ideal (not too many, not too little). In the past, I even did brainstorming activities with my kiddos and allowed them to vote on the classroom rules. While that was effective, I realized that all I really needed were 2 basic rules.

My 2 rules:

1.       Be respectful: This rule really covers all of our behavior issues. If we are respecting the teachers and others, then everything will be OK. This rule takes the place of “Stay quiet while the teacher is talking,” “Keep hands and feet to ourselves,” “Remain quiet in the hallway,” and etc…
2.       Be responsible: This covers a lot of issues. I like to tell my kiddos to take care of their business. This takes the place of “Always be prepared,” “Have your supplies ready,” “Finish all your work,” and etc…


I post these rules above our “Bucket Filler” reminder. I also like to read “Fill a Bucket” to my class every year on the first day of school. It really helps to establish a classroom community. Below you can find the activities that I like to do with my kiddos during the first week of school!


Math Resource Folders


 How do you spell September? How much is a quarter worth? How do you skip count by 3’s?

…these are all questions that elementary teachers hear all year long. To solve this problem, and to teach students at the same time, I’ve started using Math resource folders. They actually serve as our “privacy folders” for all subjects all year long. Making them is one of the first things that I like to do during our first Math lesson of the year (and it also makes a great first day of school activity). I have made these folders both ways: 2-sided and 3-sided. Last year we made 2-sided folders (made with one file folder).


This year I am going to make the 3-sided folders (made with 2 file folders). They just seem to be less crowded with information.


If you are making a 3-sided folder, you will need to assemble the folder using 2 file folders. Last year, all of mine were made out of plain manila folders. However, I found a bright blue (our school color is blue) that is sold in a large quantity at Staples. The colored folders seem to be a little thicker than regular file folders and they should hold up better.

How to construct a 3-sided folder from 2 file folders:
1. Place one file folder on top of the other. 
2. Line up the left side of one folder on top of the right side of another. 
3. Glue the overlapping sides together.


To make either the 2-sided or 3-sided folders, we simply cut out all of the information that we need for references. All of the references that I use in my classroom can be found in the link below. It’s important that the students arrange all the information before they glue it all down to make that it all fits. When they are happy with their arrangement of information, they can glue it all down. 


To ensure that the folder lasts all year, I laminate them. My second graders keep them in the top slot in their desk. We seem to use them throughout the day. They are great to use during fact tests, during Spelling tests, and when little darlings can’t seem to act pleasant to one another ;)


You can find my templates for our Math resource folders below!


Chickens! Chickens! Chickens!


I’ve been getting a lot of questions lately about our chickens. Apparently, there is an “Urban Chicken” trend. I guess that our family has been trendy and we’ve never known it. I’ve been raising chickens ever since I got married 14 years ago. It started (for me) when my husband came home with a large “surprise” in a box. I never imagined that the box would contain 20 baby chicks!


I was stunned, but he was clearly impressed with himself. He had grown up on farm on which they raised chickens for eggs and was genuinely excited to have some for our own farm. We’ve been raising chickens ever since and could not imagine our farm without them.


How we raise chickens…

Disclaimer: This is how our family raises chickens and is not meant to give instructions on how to raise them. There are several sites on how to raise chickens J

We receive our chicks in the spring. We usually only get a new batch every 3 years. Hens normally lay eggs for 3 years. We typically get around 30 chicks. The first few weeks are the toughest. You have to make sure that they stay warm at all times. Soon they can move to a larger area. We often use a kiddy pool with sand in the bottom.


After about one month, they can be moved to the chicken house as long as they are the only chickens there. Chickens can never be moved in with another group of chickens. They will peck each other to death. By August, the chickens usually begin to lay eggs! They usually lay around one egg a day during the first year.

Our chickens are the responsibility of our boys. Our oldest started taking care of them at the age of 5 or 6. The boys have to feed and water the chickens (we feed them ground feed) every evening. They gather the eggs and wash them so that they can sell them to friends and family. They save their “egg money” to buy their animals for 4-H.


TPT Challenge Week 1

I am super excited to be a part of the TPT Seller Challenge! This is just the push that I need to make my summer productive! Throughout the year I kept a list of different units that I felt like needed some revision. While teaching my units, I would jot down notes about different things that I felt could be changed. Often it was that I needed better instructions or graphics. Sometimes I found that I needed to add more to the unit to cover all of the material.

The first unit on my list was my “What is a Scientist?” unit. It was one of my first units that I placed on TPT. It is definitely time for a makeover. This is how it looked prior to the makeover:


 …and AFTER the makeover!


The NEW and IMPROVED "What is a Scientist?" unit can be found below!


Multiplication Games - Making Math FUN!!!

My kiddos absolutely love this flyswatter game! I can’t take credit for making this game up, but I have used it for years. I’ve used it in grades 2-5 and it has been a hit in all the grades. I’ve used it for addition too (you can see my addition chart showing through behind it).

It was really simple to make. For this one, I just used yellow butcher paper. This chart is actually in three parts (which makes it easier for storage and it allowed me to laminate it). I staple them all on the wall to look like it is one large chart. To make the numbers, I just used precut stars since I already had them on hand. IMPORTANT, only use numbers that are products!!! This chart is easily 8 years old. At the end of the year I take it down, roll it up, and store it for the next year.


The rules are simple – divide your class into teams (we often do boys v. girls). Give each team a flyswatter. Mine are labeled for each team.


Have some flashcards ready. I usually pick through mine and pick only the ones that we have already learned.


Both of my lines stand behind my rug. You could easily make a line on the floor out of tape for them to stand behind. The first person in each line stands on the rug (or in front of the line). I show both of the students a flash card and the first person to tap (not slam) the correct answer gets one point. The winner gets to stay for one more turn. The person who did not get it, goes to the end of their line. The first team to 25 is usually the winning team in our class.


 Guidelines before starting:
·        Make sure that they know they cannot smack the flyswatters too hard. I always joke and tell them that the teacher next door doesn’t want a new hairdo from them knocking through the wall.
·        Explain that they cannot simply hold their flyswatters close to the chart before finding the answer - this blocks the other person and they will automatically lose their turn if they do this.
·        When their turn is over, they have to gently hand the flyswatter to the next person in line.
·        If it is not their turn, they have to stay off the rug (or behind the rug).

That is it -  you’re ready to practice your facts and have fun!


Below is my FREEBIE for teaching the beginning multiplication facts!